There are so many fun ways to practice the alphabet with your kids, from reading Chicka Chicka Boom Boom to playing letter scavenger hunts.
But one of my new favorite activities is this Montessori alphabet matching printable, ideal to laminate and velcro into an interactive matching game.
This free printable is available in two letter orders: a Montessori letter order and alphabetically (A to Z). Be sure to grab your printable, and I’ll explain a bit more about Montessori letter order and how to use this fun learning activity.
What Is Montessori Letter Order?
Instead of introducing letters from A to Z, Montessori educators suggest introducing them phonetically (by how they sound) and which letters are used most often. There’s no one way to do it – in fact, I found around a dozen different letter orders, all endorsed by Montessori educators and followers.
Greenspring Montessori School¹ even suggests introducing the first letter of your child’s name as a point of interest.
You will get differing opinions on which letter order to use and how many letters to introduce at once, but the concept is the same: help your child form new words as quickly as possible.
Typically, you’d introduce letters 2-4 at a time, and easy-to-write letters are good ones to start with, like “t” and “c.”
A common Montessori letter order I’ve seen published often is:
Group 1: c m a t
Group 2: s r i p
Group 3: b f o g
Group 4: h j u l
Group 5: d w e n
Group 6: k q v x y z
The order of Hooked on Phonics’ Pre-Reader is:
Group 1: a m t s f i
Group 2: d r o g l k
Group 3: u c b n v h
Group 4: e w j p y x q z
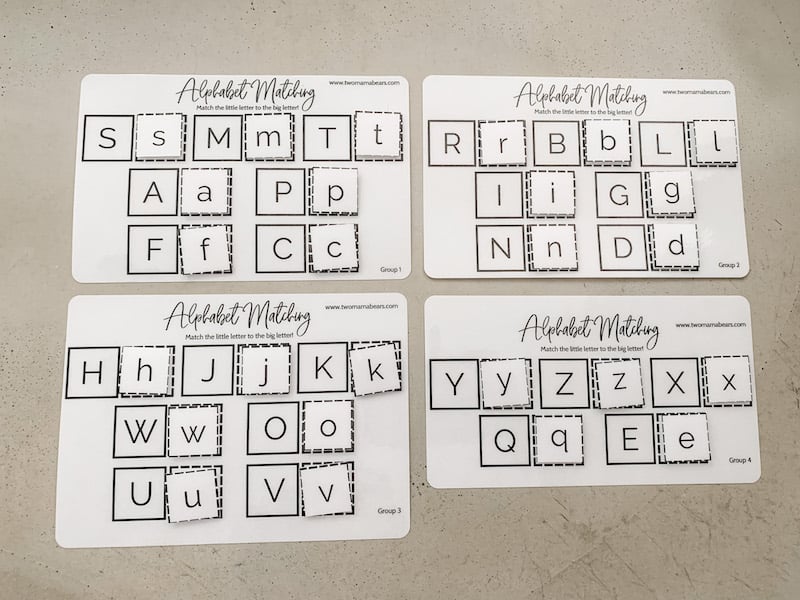
And the order we’ve done for this matching printable (ideal for spacing so it prints well) is:
Group 1: s m t a p f c
Group 2: r b l i g n d
Group 3: h j k w o u v
Group 4: y z x q e

What Age Should Use This Alphabet Printable?
This alphabet matching printable isn’t necessarily designed for introducing letters – it’s more for practicing what you’ve learned and letter review. While a 3-year-old can do this activity, it’s developmentally ideal for Pre-K age, or 4-5 years old.
Traditional Montessori educators will start with lowercase letters only, and this printable is designed for practicing upper and lowercase matching. Plus, our printable reviews 5-7 letters at a time, and you really want to introduce letters in groups of 2-4.
Finally, understanding the link between uppercase and lowercase letters is a skill your child can master around 4-5 years old. Educators² recommend displaying the uppercase and lowercase letters side-by-side, which is what this printable is asking your child to do.

If you want to start introducing letters with your 2-3-year-old, I’d highly suggest picking up the book Montessori: Letter Work, which is a great companion to this Montessori matching printable.
Montessori: Letter Work Book
I have to give a quick shout-out to the Montessori: Letter Work book by Bobby and June George. This is a great way to introduce the alphabet to your children in a participatory way.

The letters in this book have a sandpaper texture – often referred to as Montessori sandpaper letters – so your child can literally get a feel for the shape of the letter. The book also introduces letters phonetically (by the way they sound) rather than from A to Z.
Rose Henson explains in Montessori Life Magazine³ that this book entices young children to touch and explore, which I couldn’t agree with more. So, if you’d like to introduce the alphabet to your little one, I’d get the Montessori: Letter Work book!
How to Assemble the Montessori Alphabet Matching Printable
Assembly is easy – we’re going to print the worksheets, laminate them, cut out our letters, and add velcro. (Get supplies links on our Product Recommendations page.)

There are two letter orders included in this printable – Montessori letter order and A to Z. You can laminate both or just one – just select which pages to print in your print settings.

Once you’ve printed your pages, go ahead and laminate them.


Then, cut out your lowercase letters.
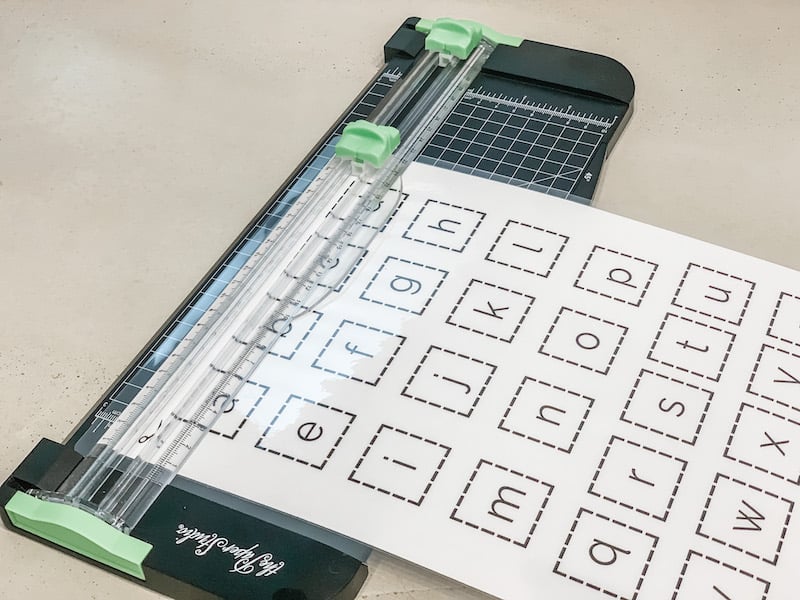


And cut out the uppercase letter half-sheets.


I also like to round the edges.
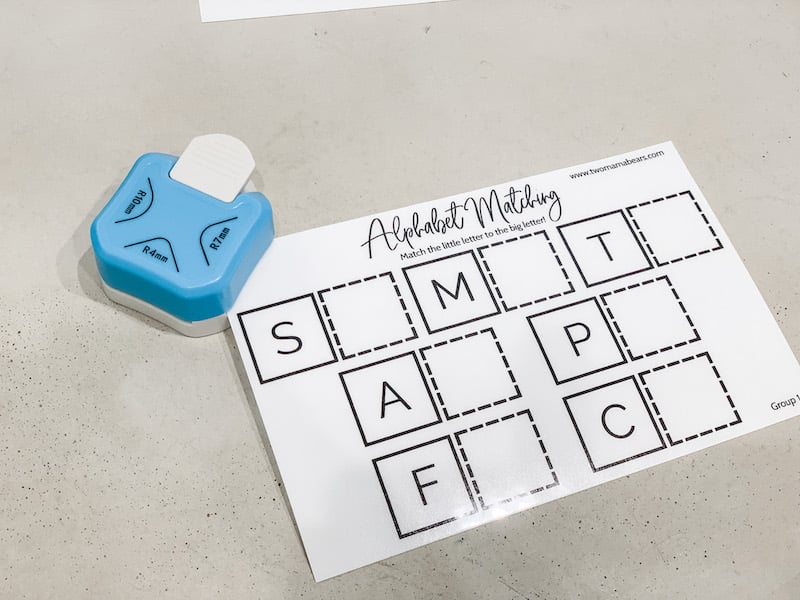

Finally, add velcro to the empty spaces, layer the velcro on top, and stick on your lowercase letters.


Enjoy!

How to Get the Most From Your Alphabet Matching Printable
There are several ways to use the alphabet matching printable!
One way is to do this matching game with your child, guiding them. For example, you might hold up the letter “t” and ask, “where’s the match?” You can also hover the lowercase letter over several spots, asking your child “is this the match? What about this one?”

Another is to have your child do this independently. You can set the lowercase letters off to the side and let your child match them on their own.

You can even progress through the four letter groups, doing a combination of guiding and independent learning. You may do the Group 1 letters with your child, and then ask them to do it independently. Don’t forget to high-five for a job well done! 🙂


Finally, you can use the lowercase letters on their own to supplement other alphabet learning activities. You could set down the letter “b” and ask your child to find things that start with the letter “b”. As an example, they might set down a ball and a bee.
Theresa from Montessori In Real Life⁴ does something similar, which she calls a sound tray. She’ll put a letter in a tray and add items that start with the letter sound. For example, she may put the letter “s” in the tray and add a sailboat, spider, and strawberry. She says the name of each object, ensuring to really enunciate the “sss” sound, helping to connect the letter to its sound.
Stay-at-home mom perspective: I love this idea of creating sound trays! It might even be fun to turn this into a sorting activity once your child has mastered a few letters.
Conclusion
Anything you can do to make learning fun is a win in my book. By turning alphabet practice into a matching game, you’re giving your child a chance to look forward to their ABCs!
Be sure to check out our other alphabet learning activities!
Sources: