Many people only think of Cricut for cutting paper, but there’s so much more that it can do, and today’s puzzle really shows that off!
Cutting wood and heavy chipboard is an amazing feature of the Cricut Maker machine. What better project to test this out than a delightful peekaboo shape puzzle for babies and toddlers.

When your child lifts the shapes, they will encounter familiar faces smiling at them from the pictures you choose. This toy will also help your child develop fine motor skills and eye/hand coordination as they grasp the wooden pulls and fit the shapes into the puzzle.
Why make a peekaboo puzzle for your baby/toddler?
From birth, babies are wired to love looking and responding to faces. The faces of their loved ones will delight them each time they discover what is under the puzzle shape.

Every little one enjoys a game of peekaboo, and now they completely control it. There is always a familiar, smiling face looking back at them. Perhaps you will choose instead to put the faces of those they see less frequently, like Grandma and Grandpa! And why not change out the pictures for a fun surprise?
That’s what’s so great about making this yourself – you can choose the shapes you want and put the pictures in to make it all yours.
The small knobs fit small toddler hands, so little ones will delight in discovering colors and patterns while developing fine motor skills. And you can smile as you see your child or grandchild playing with a toy you made uniquely for them.

Have fun with the colors or patterns you put on each piece as well as the faces you choose to have your little one discover.
What if I don’t want to make this puzzle myself?
There are companies that sell these personalized shapes puzzles, but I thought they were pretty pricey at $50-$70 a piece (and they’re often sold out). That said, if you’d rather purchase a done-for-you puzzle, here’s the link to check it out.

Lovevery also has a peekaboo puzzle with faces in The Babbler Play Kit for 13, 14, and 15 months old. The only downside here is you can’t personalize the images under the puzzle pieces.

In addition, if you like the concept of this wooden shapes puzzle but don’t necessarily care about any photos under the puzzle pieces, there’s a great, affordable option on Amazon from Adena Montessori.

Supplies You’ll Need
Here’s what you’ll need to make your own peekaboo puzzle:
- Cricut Maker machine
- Knife Blade and Fine-Tip Blade (all machines come with the fine-tip blade)
- 1/16” basswood sheets (I found mine at Hobby Lobby, Cricut was sold out when I went to purchase)
- Cricut Strong Grip Mat (For chipboard and basswood)
- Cricut Standard Grip Mat (For Permanent Vinyl and cereal box)
- 2mm Chipboard
- 1 cereal box or lightweight chipboard
- Masking Tape or Painter’s Tape
- Wood Glue (I used Elmer’s Carpenter’s Wood Glue Max from Amazon) – be sure that whatever glue you use is considered non-toxic, because babies love to put things in their mouths!
- Gorilla Glue (optional – you could use wood glue in its place)
- Clear Plastic Sheet (I used K & S Clear Plastic Sheet .015 Thick from Hobby Lobby)
- Mini Drawer Pulls (Woodpile 3/4” from Hobby Lobby)
- 3 sheets of permanent glossy vinyl (I used Oracal 651 in Red, Yellow, and Blue)
- Photos of your choice, cut to size

How to Make a Peekaboo Wood Puzzle with Cricut Maker
Now that you have your supplies ready, it’s time to get started! Your first step is to design the puzzle in Cricut Design Space.
Follow these simple steps:
Step 1
Start with the rectangle piece (which will be your base). In Design Space, select the rounded rectangle shape from the shapes tab.

Step 2
Resize the Rectangle to the dimensions you want. Click unlock above the width and height boxes on the top and type in the correct width and height you want. I chose to make my puzzle 10.8” x 4.909”. (This was actually a mistake, I meant to make it 10.8 x 5.)
Keep in mind: the size of your basswood and the size of your chipboard when doing so as this comes in odd-sized sheets.

Step 3
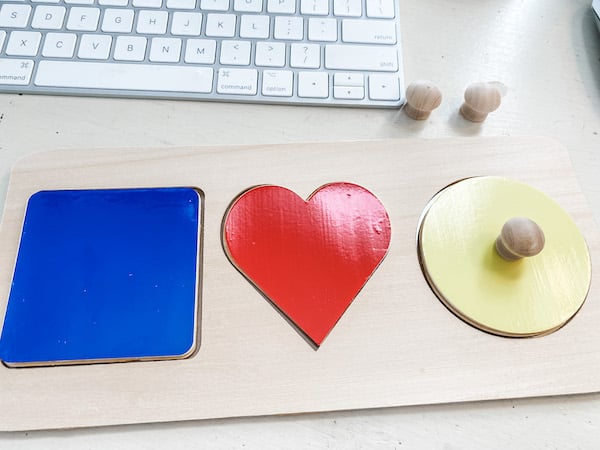
Add your shapes for the puzzle. I chose a circle, heart, and square. I sized them each to 3.1” in width and height. Then, place them where you would like them on your larger rectangle.
If you want to be sure they are centered vertically, highlight all the shapes and click on align. Then, click center vertically.

Step 4
Add your shapes a second time and size them .1” smaller than the original shapes. This will ensure your puzzle pieces fit into the shapes easily. I sized them at 3”.
I’ve colored the shapes in my picture as the colors I will eventually make them (red, yellow, and blue).

Step 5
Duplicate your original large rectangle and move it off to the side.
Right-click the rectangle and select duplicate. You now have three rectangles and three shapes.

Step 6
Select your original rectangle and one of the original shapes – I’m starting with the circle. Once you have them selected, click slice on the bottom right menu.


On the right-hand side, delete the slice result of the circle – there are two of them. Repeat with the other two shapes.
It should now look like this:

Step 7
Duplicate your colored shapes twice. Make one set light grey, one set medium grey, and leave the third set as yellow, red, and blue.
Duplicate your rectangle shape as well. Make one a brown wood color, and one white.


Now, you need to slice one of your rectangles to make a “spacer” piece out of your cereal box for the plastic sheet to slide into like a pocket. To do this, add a square shape to your design space, unlock the width and height, and size it to 10.408 x 3.586.
Place this new, smaller rectangle on top of your duplicated rectangle so it looks like this. (Again, use the align tab to center vertically.)

Select highlight to highlight both pieces and click slice on the lower right corner. Now, delete the extra pieces until you are left with this:

Make sure one set of three of your shapes is one color, make the second set another color, and for the third set, you need to make it the color of vinyl you will adhere to the piece. That way, each set will be cut on one mat from one piece of basswood.
Make all three rectangle pieces different colors. This separates each cut so each piece will go on one mat. Each will be of different materials. To change the color, go to the box to the right of the “operation” which says “basic cut,” and click the color box. Choose your color from that dropdown menu as you select each item on your screen.
Step 8: Review Your Progress
To review, you have:

- A cut-out rectangle that will be basswood
- A full rectangle that will be heavy chipboard
- A sliced rectangle that will be a clear plastic sheet
- A sliced rectangle that will be a cereal box or light chipboard
- Circle, Heart, and Square – Basswood
- Circle, Heart, and Square – Basswood
- One circle – yellow vinyl
- One heart – red vinyl
- One square – blue vinyl
Now, you’re ready to cut!
Cutting Your Peekaboo Puzzle for Babies & Toddlers
Step 1
Click make it. You will probably want to move your pieces around, as once again, your basswood probably came in weirdly-sized sheets.
Step 2
Pick your machine and material type. Begin your cut with your knife blade inserted for the chipboard and wood and the fine tip blade inserted for the vinyl.


For the chipboard and basswood, be sure the white star wheels are moved all the way over to the right before you insert your material. If you don’t, you will get groove marks in your material from the wheel guides.

Use the strong grip mat when cutting, and use painter’s tape or masking tape on all corners when cutting. I also needed to edit my shapes and move them to fit where my basswood was on my mat.
Step 3
- Cut the shapes from the basswood
- Cut the cut-out rectangle from 2mm chipboard
- Cut the other cut-out rectangle from the cereal box or light chipboard
- Cut one full rectangle from a clear plastic sheet
- Cut one full rectangle from basswood
- Cut each shape from the colored vinyl


Please note that cuts with the knife blade can take a while. The chipboard and basswood will be cut making many passes.


Assembling Your DIY Peekaboo Puzzle
Once your pieces are cut, it’s time for assembly! It is simply amazing the cuts you can get on heavy chipboard and wood.
Step 1
Use the wood glue to attach your chipboard, cereal box piece, and basswood.

- Layer 1 – heavy chipboard
- Layer 2 – light chipboard (cereal box)
- Layer 3 – cut out rectangle basswood
Be careful to not get glue on the front of the basswood and to keep it from going into the area where the plastic sheet will slide. Check that the plastic will slide freely.


Step 2
Glue the two layers of basswood shapes together with wood glue. I then put them under a couple of books as they cured to keep them flat until they were completely dry.
Allow all of your pieces to cure before continuing.

Step 3
Cover your shapes with the permanent vinyl. I did not use transfer tape to put the vinyl on as you would for more complicated projects – I simply peeled the shapes off of the sheets and placed them on the shapes. I then used a brayer to make sure there was a good seal on the wood.
You could paint them or stain them if you prefer.

Step 4
Attach the mini drawer pulls with glue to the center of each shape. I love the small wooden pull, which is great for developing fine motor skills.
For this item, I used Gorilla glue rather than wood glue, but the wood glue would have worked as well.

Step 5
Print out three pictures and cut to size. Tape onto the plastic sheet. Slide plastic with pictures into the puzzle.
Conclusion
I know it seems like a lot of steps, but how fun to create your very own peekaboo, customizable puzzle! Plus, it’s a great feeling knowing your children or grandchildren are playing with something you made just for them.

Let me know if you make this fun toy in the comments. I’d also love to see any photos – you can upload them with your comment here or tag @thetwomamabears on Instagram.
Happy crafting!
Looking for more Cricut projects and content? Check out these guides: