

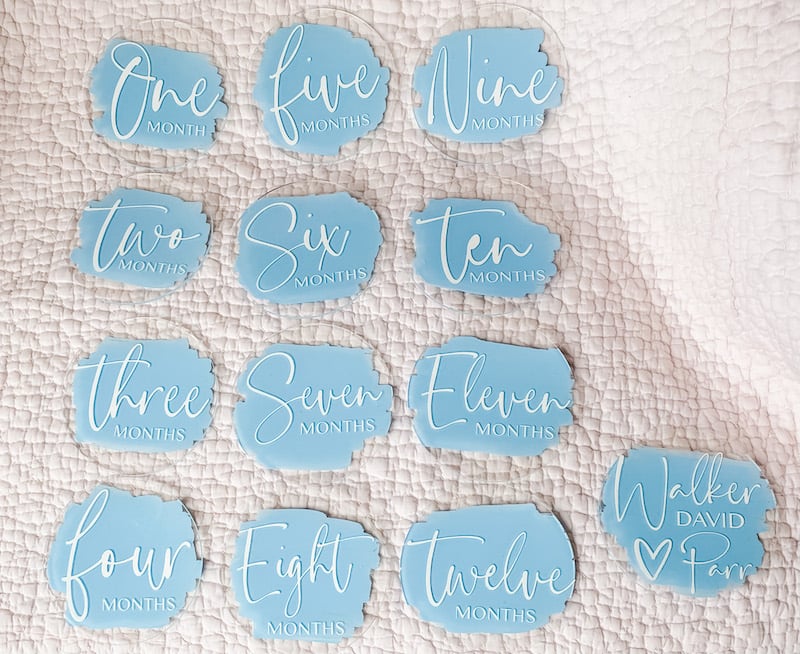
Is there any sweeter trend right now than monthly pictures of a baby in their first year? I see them posted on social media, and it’s a great way to stay updated on my nieces and nephews and friends’ children.
I’ve admired all of the different ways to mark the month in these photos and particularly like the milestone discs.
Here is an easy Cricut project and a step-by-step tutorial on how to make your own acrylic milestone discs. And the best part? You can personalize them for a fantastic baby shower gift or birth gift at a fraction of the cost of ordering them online.

Note: Don’t have a Cricut or the time to make these yourself? You can purchase them online here.
DIY Baby Milestone Discs
The beauty of making these milestone discs yourself is that you can personalize them!
I’ve seen some very creative discs that go beyond just labeling the months. You can create discs that say:
- “My First Tooth”
- “It’s a Girl”
- “It’s a Boy”
- “Hello World”
- “My First Haircut”
- “I Smiled Today”
- “Today I Rolled Over”
- “Today I Stood”
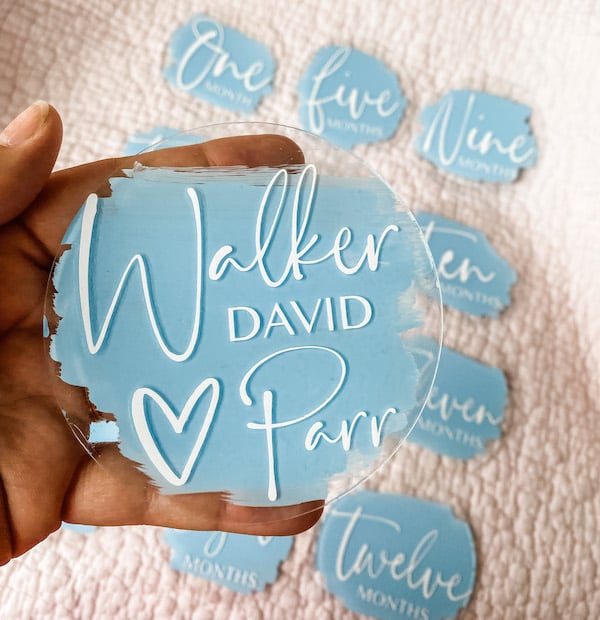
And of course, you can add the baby’s name, date of birth, and whatever other creative saying you think up!
Supplies Needed
To make these DIY acrylic baby milestone discs, you do need some equipment and supplies. The Cricut machine is definitely an investment, but I use it for a ton of different projects!
That said, it certainly doesn’t make sense to buy a Cricut just to make these discs. If you want the personalized milestone discs but not the machine, you can look into ordering these exact discs on my website.
Here’s what you’ll need:
- Cricut Maker machine (or the Explore Air)
- Cricut Design Space on computer
- Cricut Standard Grip Mat
- Everyday Iron-On
- Weeder
- Cricut EasyPress
- Acrylic Discs (I used these 4” round precut Acrylic Discs from Amazon)
- Acrylic Paint (I used this Apple Barrel Gloss Acrylic Pain, Light Blue from Amazon)
- Clear Acrylic Sealer (I used this Mod Podge Gloss Clear Acrylic Sealer, available on Amazon)
- Small Paint Brush or foam brush
Design
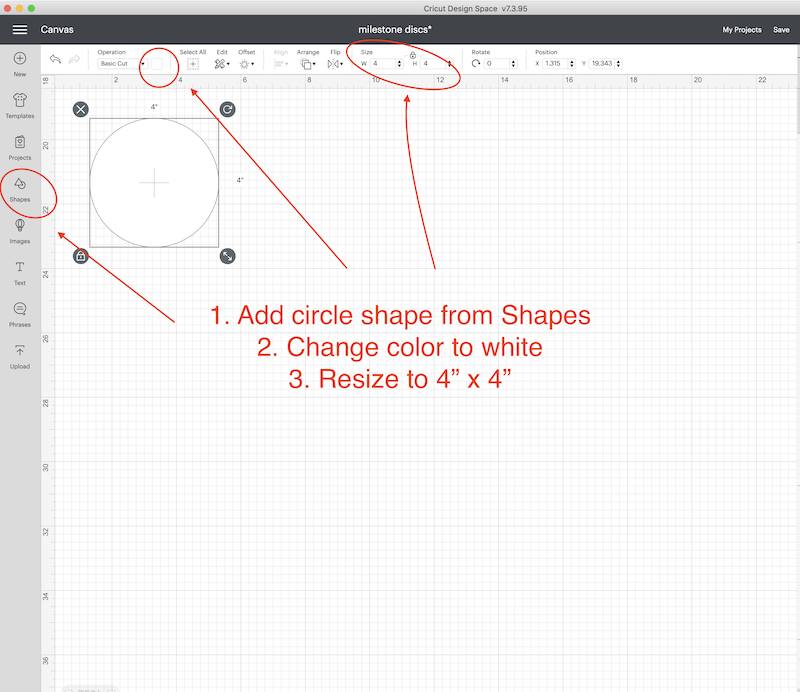
Open Design Space, add a circle, and resize it to the size of your discs. Mine are 4.” Make your circle white so you can see your design on it.
Add a text box (from the left menu) and type in “One.” In the fonts, you will choose a font of your choice. I used a font I downloaded called “Rustling Sound.” It is a free font that you can get online.
Close your design space software. Install the font to your computer. Reopen Cricut Design Space and select this font from the font list. If you prefer to use a Cricut font, a good choice would be Babette font or Chloe font. Either would be a good script font for this project.
Resize your word and place it inside the circle.
Add another text box and type “MONTH.” Change the font to Kannada MN (A Cricut Access Subscription font). Resize and add to your circle.
Once you have placed both words and sized them exactly how you want them inside the circle, you will highlight both words and click “ATTACH.” This will keep your words together when you go to print them.
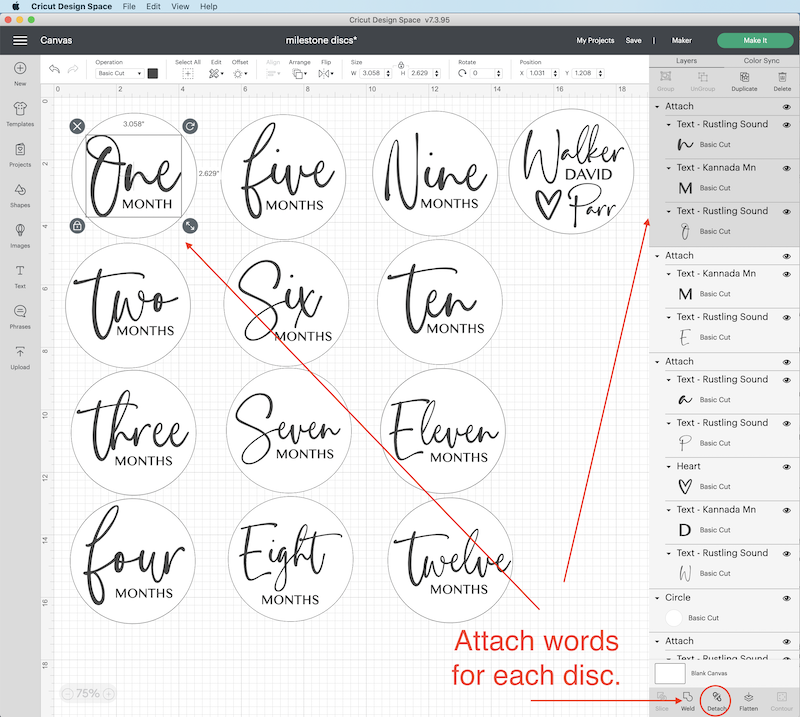
Repeat the above steps for all of your months. Then, delete the circles behind your words until your canvas looks like this.

Now you are ready to cut your vinyl.
Cut and Apply Vinyl
You have two choices for vinyl: permanent adhesive vinyl or iron-on vinyl.
I chose iron-on because that is what I already had at home in white. If I had this to do again, I would probably choose the permanent vinyl; it would be much easier and eliminates the need for an EasyPress.
You also won’t have to worry about the discs warping at all from the heat if you use permanent vinyl – I have some tips to help with this.
Iron-On Directions
Make sure you mirror your design after you click “MAKE IT” by clicking on EDIT under the mat shown.
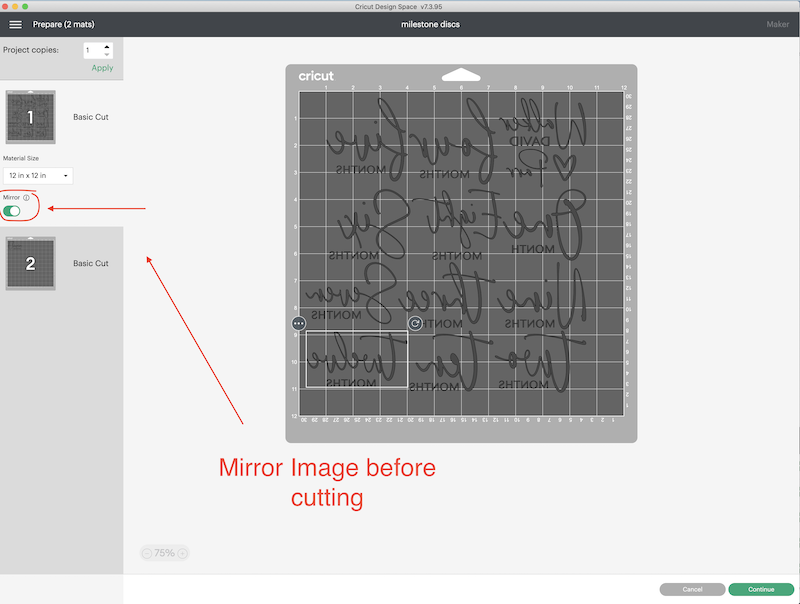
Place Iron-On Vinyl shiny side down onto mat.
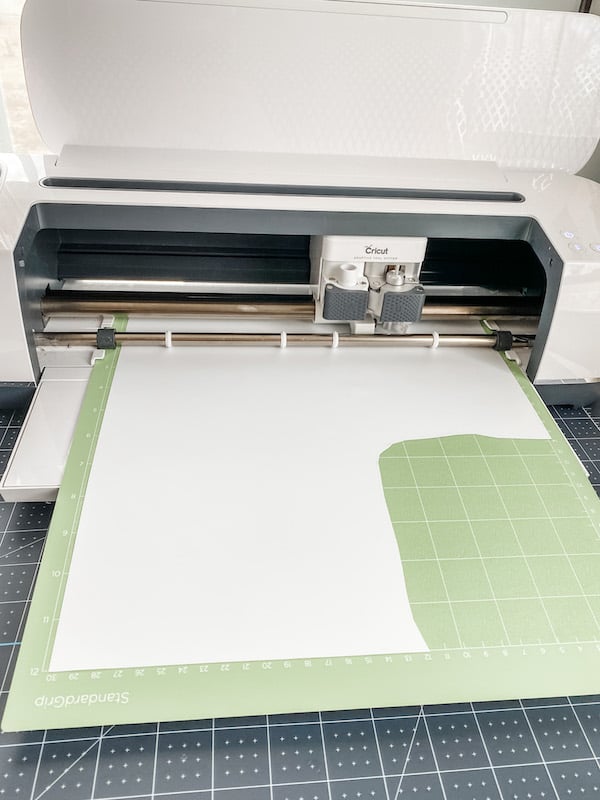
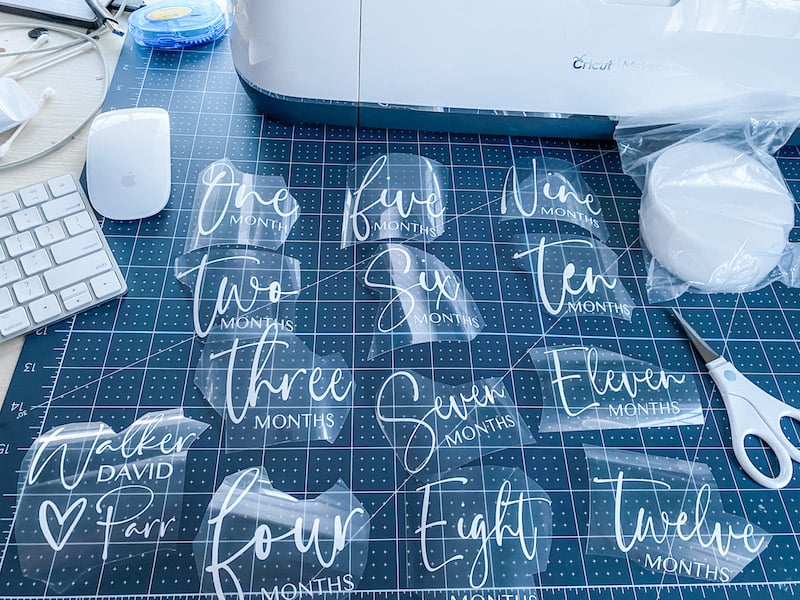
Cut and weed on mat.

Once off of the mat, you will cut your vinyl sheet into separate pieces so you can apply the designs to the discs.
Preheat EasyPress to 280 degrees. I had the most success by keeping my heat low and only pressing for 5 seconds at a time. Place your disc on your towel or EasyPress Mat (be sure to peel away the protective sheet from the disc). Lay the iron-on transfer on the disc, and place a sheet of Parchment paper over the transfer and disc.
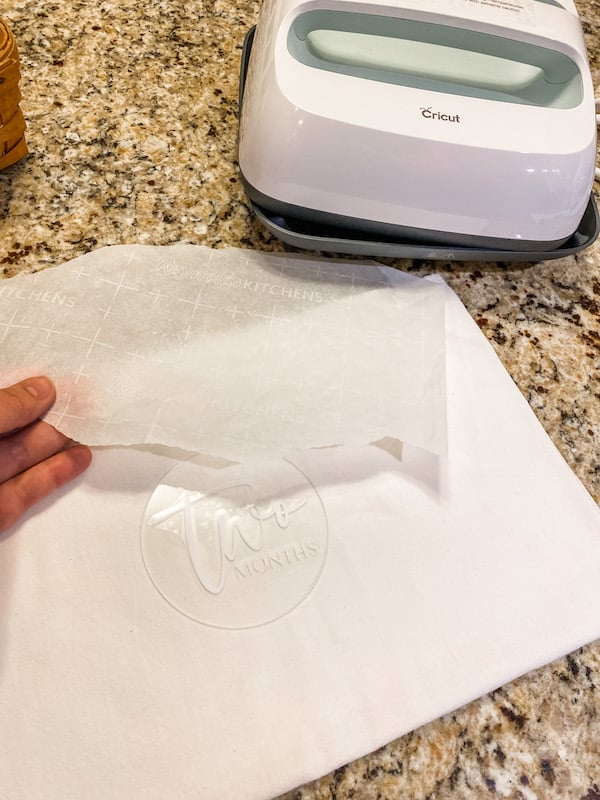
Press with Easy Press for 5 seconds. Take Off. Press again for 5 seconds. Let cool. Remove clear transfer sheet.
If a small portion of the design isn’t fully stuck on, that’s OK. Just carefully lift the clear sheet, and make sure the design is where you want it permanently. Now, you will place the parchment paper back on your design and press again for 5 seconds. Take off, and press again for 5 seconds. Your design is now permanently adhered to the disc.
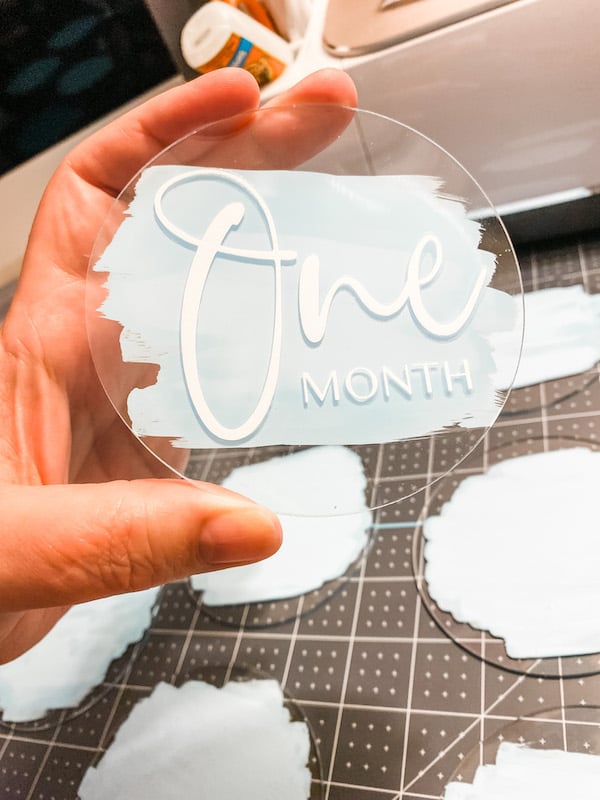
You may see an outline of the iron-on adhesive around your design. That’s ok. Once you paint the disc you won’t notice this at all.
You will always do two pressings. One with both the clear transfer sheet and parchment, and another after the clear sheet is peeled away with only the parchment. Parchment works best because it quickly releases heat. We want to eliminate warping, so always use parchment paper.
Now, you are ready to paint!
Permanent Adhesive Vinyl + Cricut Transfer Tape Directions
Click “Make it.” Place your vinyl on your standard grip mat, load it into Cricut, and cut. Weed the vinyl while it is still attached to your mat.
Take the sheet off of the mat and cut it into separate pieces for each disc. Take a sheet of transfer tape, and use your Cricut scraper or Cricut Brayer to full press the transfer tape onto the vinyl.
Slowly peel the transfer tape away from the original vinyl sheet, and the vinyl will come off with it. Then, center your design on a disc (be sure to peel away the protective sheet from the disc first) and place your design onto the disc, fully press with a brayer or scraper. Peel away transfer tape.
Paint and Seal
Once all of your discs have their designs, you are ready to paint the back. I used a small brush I had – a small foam brush will work well.

Paint the reverse side (be sure the protective coating sheet is removed before painting). Be sure all brush strokes go the same direction on all discs, this makes a uniform and professional look.
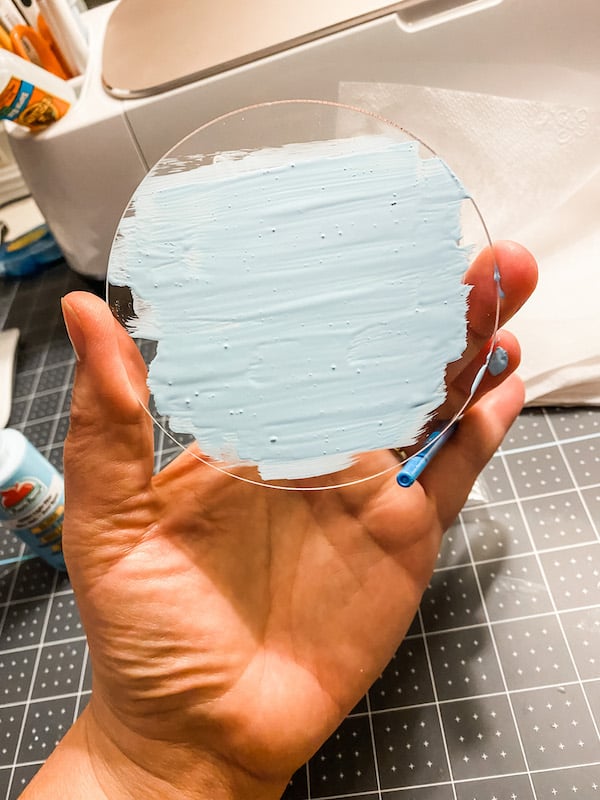
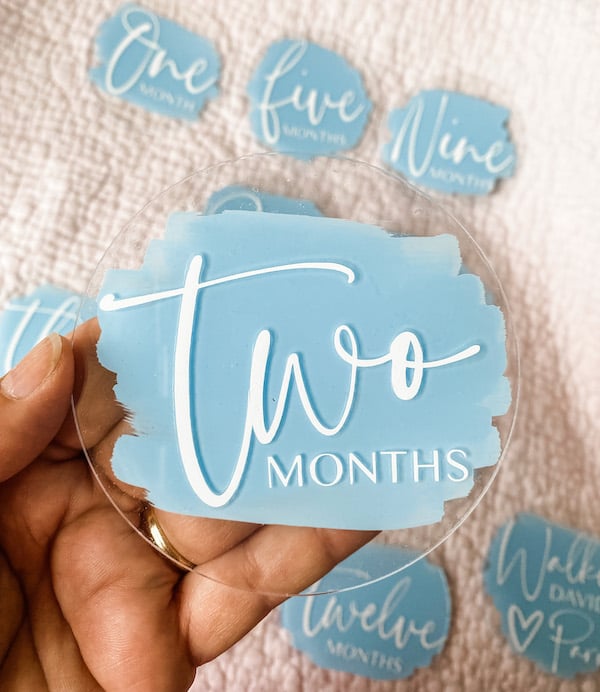
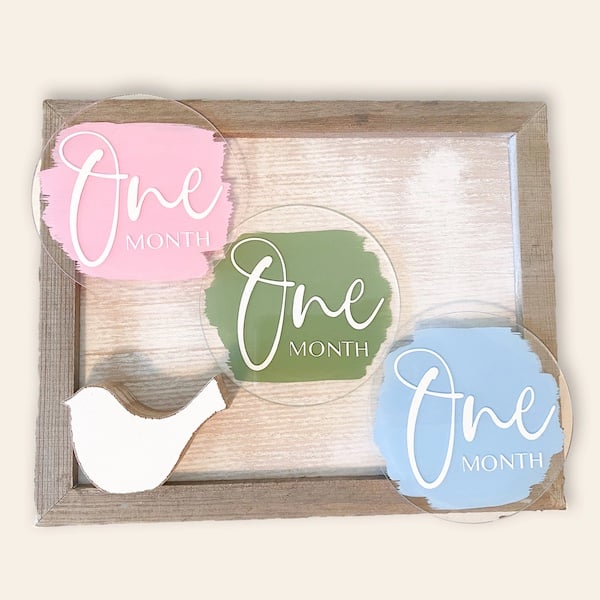
The beauty of this is there is no “perfect” way to paint. Just go with it! It should look “unfinished.” Just be sure to have paint behind all of your words so they show up well. I used light blue paint for a baby boy, but you can choose any color. I’ve seen beautiful discs in sage green and a set that did a multi-color design, which was very unique and lovely.
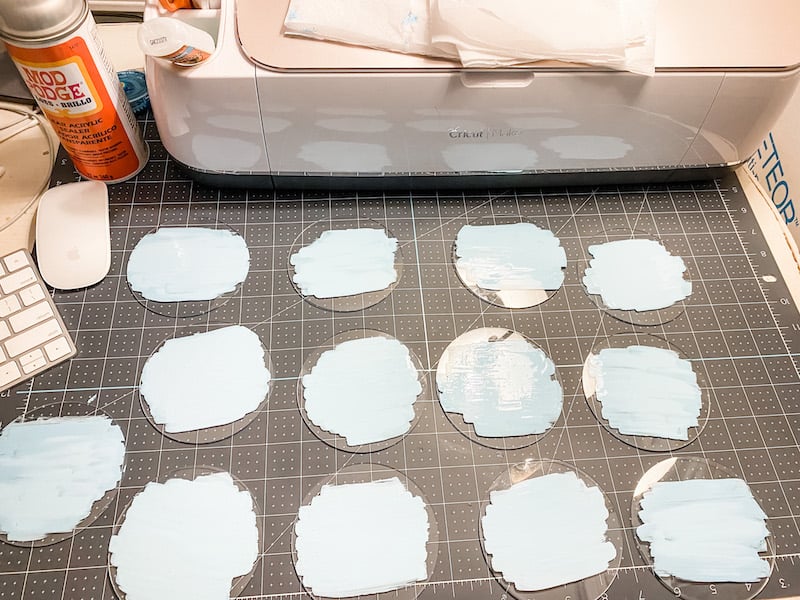
Let your discs dry for 24 hours before applying a clear gloss seal over the paint. I chose to do this so that none of the discs got scratched in shipping.
Lay out all of your discs in a well-ventilated area, and using short sweeping bursts about 10 inches from the discs, give a light coating of spray to all discs. Do not go heavy with the spray; you don’t want any pooling or dripping. Leave them to dry for several hours.
Conclusion
Now, you have the perfect personalized baby gift! Let me know if you come up with any other cute ideas and sayings for these discs in the comments below.
Happy crafting!


Oh my gosh these are so adorable! I’ll be ordering after Saturday when we find out the sex of our next grandchild. So awesome!!!
Thanks, Molly! Can’t wait to hear if baby is a girl or a boy!
I love these so much but I was wondering if you seal the side with vinyl also?
We’re glad you love them!! I asked my mom, and she said, “No I don’t, I seal the back over the paint with the spray. The vinyl is cut for the words and placed on the top only.” I hope this helps!